
Hap-Hap-Happy Thursday LADIES!!! My, how much faster a week goes when we have Monday off (my school was out for President's DAY- YIPEE!) I am going to try to keep this BRIEF...I am SOO VERY excited to bring to you the Attic's first guest blogger LAURA MCPHERSON!!! Laura is a Winfield girl (like me!!) who is just an amazing photographer and graphic artist. She is SERIOUSLY one of the nicest people you will ever meet! She helped me so much with Blogger Layout (for both the Attic and my personal blog) that I only hope I will be able to reciprocate or "Pay it Forward" one day! And I HAVE to say that I think this first guest post from Laura is soo informational and inspiring---I hope you feel the same way. Laura has even agreed to return from time to time with new ideas! We are such lucky girls here at the ATTIC BLOG!!! Soo, without further delay....here is the "lady of the hour".........

I was so honored to be asked by Danelle to do this. I have tons of things I would love to share with you, so it's been a challenge for me to narrow it down to one tip for this time, and keep it somewhat simple! I am going to share a basic photography tip that everyone can use, whether you have a point-and-shoot camera or a DSLR.
I have always loved photography, and have been through many cameras in the last few years. I purchased my first SLR (Canon Rebel Xsi) in March 2009, and learned SO MUCH from it. I even took a basic photography class at The Attic!! My Rebel was an awesome starter SLR, and I would highly recommend it to anyone that currently has a point-and-shoot, but wants to have more control with their photography. After my semi-pro photography biz started to take off, I upgraded to a Canon 50D. I am a natural light photographer, which means I shoot without the use of studio lights and equipment. I prefer to shoot outdoors, but indoors by a big 'ol window works just as great.
So...my most important tip would be to TAKE ADVANTAGE of natural light, and TURN OFF that flash! Compared to photos taken with a flash, natural light is beautiful and soft. NOT that flash is always bad...there are some circumstances when you've just got to use it! That said, I NEVER use direct flash on any of my client photo sessions! Of course a lot of you readers are scrapbookers, and that means you're always taking pictures to document the events of your lives, and use in your layouts. This tip isn't necessarily something you need to utilize for your everyday, spur of the moment shots. Maybe just those times when you are purposely planning to capture some indoor photographs... a special occasion, like your baby is 3 months and you want to take some pictures of her to document this stage.
{3 month old baby: Indoor shoot}
Okay, you've got your baby in her cute little outfit, and you're ready to get some pics! Find a spot in your house by a big window, sliding glass door, etc. Morning and late afternoon hours are best...you don't want the sun to be pouring directly in on you. Having the natural light from a window will allow you to be able to turn off the flash. Turning OFF the flash does these three wonderful things: {1} Not using the flash allows you to shoot fast! When you don't have to wait for your flash to fire, you won't miss those adorable moments that happen quickly. This is something I hear from moms with point-and-shoots all the time..."my camera is so slow, I miss everything the baby does." That is because you're probably using the flash. {2} Not using the flash will eliminate that harsh shadow around/behind your subject, and the bright washed-out skin tones. {3} Not using the flash will eliminate annoying red-eye.
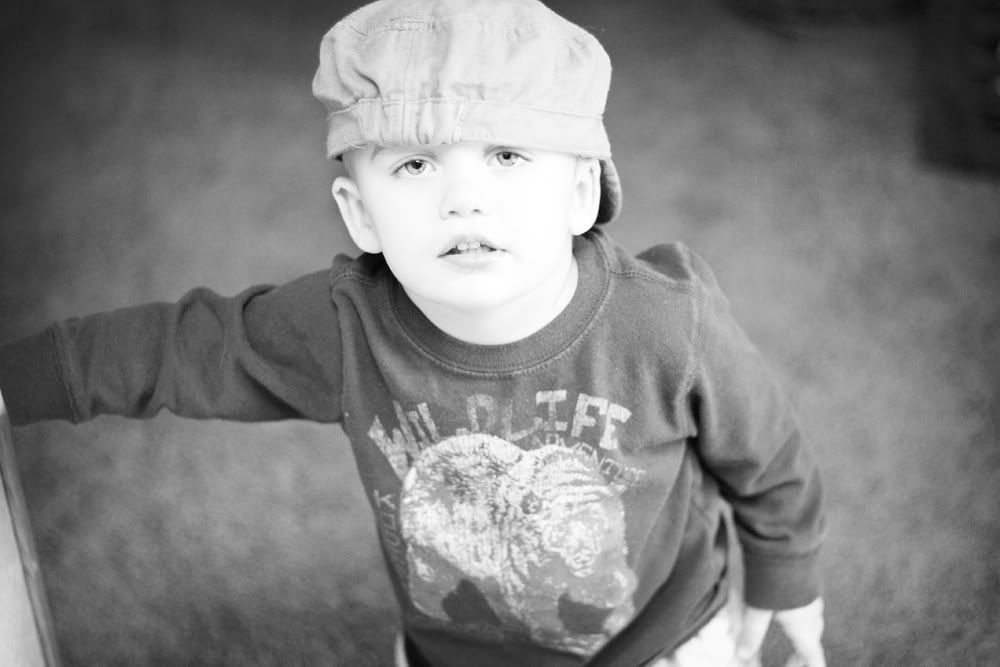
Here is a sample of what bad flash can do to a photo:
There is a horrible shadow/halo behind his head, and he has red-eye

This is how the set-up was...

I have always loved photography, and have been through many cameras in the last few years. I purchased my first SLR (Canon Rebel Xsi) in March 2009, and learned SO MUCH from it. I even took a basic photography class at The Attic!! My Rebel was an awesome starter SLR, and I would highly recommend it to anyone that currently has a point-and-shoot, but wants to have more control with their photography. After my semi-pro photography biz started to take off, I upgraded to a Canon 50D. I am a natural light photographer, which means I shoot without the use of studio lights and equipment. I prefer to shoot outdoors, but indoors by a big 'ol window works just as great.
So...my most important tip would be to TAKE ADVANTAGE of natural light, and TURN OFF that flash! Compared to photos taken with a flash, natural light is beautiful and soft. NOT that flash is always bad...there are some circumstances when you've just got to use it! That said, I NEVER use direct flash on any of my client photo sessions! Of course a lot of you readers are scrapbookers, and that means you're always taking pictures to document the events of your lives, and use in your layouts. This tip isn't necessarily something you need to utilize for your everyday, spur of the moment shots. Maybe just those times when you are purposely planning to capture some indoor photographs... a special occasion, like your baby is 3 months and you want to take some pictures of her to document this stage.
{3 month old baby: Indoor shoot}
Okay, you've got your baby in her cute little outfit, and you're ready to get some pics! Find a spot in your house by a big window, sliding glass door, etc. Morning and late afternoon hours are best...you don't want the sun to be pouring directly in on you. Having the natural light from a window will allow you to be able to turn off the flash. Turning OFF the flash does these three wonderful things: {1} Not using the flash allows you to shoot fast! When you don't have to wait for your flash to fire, you won't miss those adorable moments that happen quickly. This is something I hear from moms with point-and-shoots all the time..."my camera is so slow, I miss everything the baby does." That is because you're probably using the flash. {2} Not using the flash will eliminate that harsh shadow around/behind your subject, and the bright washed-out skin tones. {3} Not using the flash will eliminate annoying red-eye.
Here is a sample of what bad flash can do to a photo:
There is a horrible shadow/halo behind his head, and he has red-eye
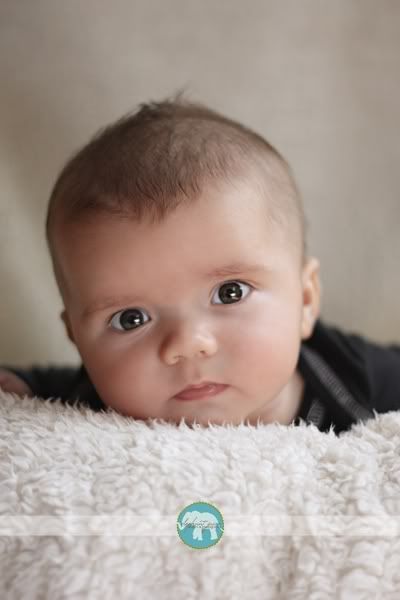
Here is an example of using window light, from one of my 3-month sessions:
Notice the difference in the EYES from this photo and the photo above.
Flash can create red-eye, but the natural light creates beautiful catch light {those white spots in the baby's eyes below}.
Notice the difference in the EYES from this photo and the photo above.
Flash can create red-eye, but the natural light creates beautiful catch light {those white spots in the baby's eyes below}.
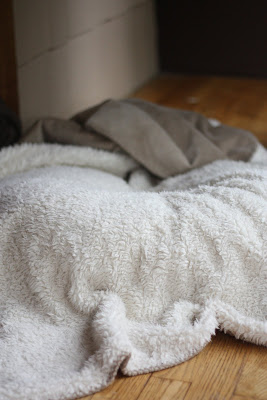
This is how the set-up was...
Very simple...Boppy pillow on floor, blanket thrown over it, with enough blanket at the back for baby daddy to hold up as a backdrop.

*If you have a point-and-shoot: you can shoot in the green square or ISO modes, just be sure you manually turn your flash setting to "off"
*If you have an SLR, you will get the best results if you venture away from the green square! The green square is the "safe mode" where the camera does all the thinking for you. This is perfectly fine, but if you're lucky enough to have an SLR, it would be a shame not to learn a little about the manual modes! Try the AV mode to get you started, then make sure your pop-up flash is down.
*If you are more experienced with your SLR and have worked with AV mode before, set your aperture/f-stop wide open (as low as the number will go). That low f-stop will depend on the lens you are using. If you're using the 18-55mm kit lens, it's probably something around f/3.5. I shoot primarily with the 50mm 1.4 lens...so I usually set my Aperture to around f/2.2. Wide open aperture/low number f-stop will give you that blurred background everyone loves.
No matter what type of camera you use, make sure to hold it steady and focus on the eyes! If the eyes in a photo are out of focus, the image will not have the same impact. When using an SLR in the AV mode, you can manually select your focus point.
********If you have an SLR, you will get the best results if you venture away from the green square! The green square is the "safe mode" where the camera does all the thinking for you. This is perfectly fine, but if you're lucky enough to have an SLR, it would be a shame not to learn a little about the manual modes! Try the AV mode to get you started, then make sure your pop-up flash is down.
*If you are more experienced with your SLR and have worked with AV mode before, set your aperture/f-stop wide open (as low as the number will go). That low f-stop will depend on the lens you are using. If you're using the 18-55mm kit lens, it's probably something around f/3.5. I shoot primarily with the 50mm 1.4 lens...so I usually set my Aperture to around f/2.2. Wide open aperture/low number f-stop will give you that blurred background everyone loves.
No matter what type of camera you use, make sure to hold it steady and focus on the eyes! If the eyes in a photo are out of focus, the image will not have the same impact. When using an SLR in the AV mode, you can manually select your focus point.
Here are some other samples {from my client sessions} of using natural light sources when you are shooting indoors. Please note that my client shots HAVE been edited in Photoshop. You have to have great lighting to get a good shot to start with, but don't be disappointed when your shots don't come out of the camera looking just like this :) The lighting and lenses I use are what gives me tack sharp and creamy images. No matter what equipment you have, you WILL notice an improvement in your photos with some practice!
This shot is of the same little boy show above, in the same room, with the same set-up, only he was sitting in the doorway facing directly towards the window light, and he was 6 months!


You can see more samples of my work on my photoblog
Here are some samples of my son, Barrett! The best place for natural light in our house is the entry, right inside the front door. ALL of these shots were taken there! The first two were lightly edited in Photoshop, for sharpening and b&w conversion.

This shot is of the same little boy show above, in the same room, with the same set-up, only he was sitting in the doorway facing directly towards the window light, and he was 6 months!
For this newborn shot, the natural light {coming from a sliding glass door} was directly behind me. Baby was propped up on a Boppy pillow again, and Dad was holding the fabric up behind her.
You can see more samples of my work on my photoblog
*******
Here are some samples of my son, Barrett! The best place for natural light in our house is the entry, right inside the front door. ALL of these shots were taken there! The first two were lightly edited in Photoshop, for sharpening and b&w conversion.
My own at home set-up:


You can see more of my personal photography & everyday shots on my family blog
The green circles show where I had Barrett sitting in these next images. The lighting on the wall directly across from the door is not as soft, so I scooted him down a bit. Where I position him depends on the amount of light coming in, and the look I'm going for. For the b&w shot above, I just taped some fabric to the wall for a different backdrop.
These next two DO have some shadowing on the wall behind Barrett's head, but that is true shadow created from the natural light. A flash shadow would be more harsh, and in unnatural places, like a halo around the head (shown above). These two shots are SOC (straight out of the camera), and have not been edited.
You can see more of my personal photography & everyday shots on my family blog
I hope I haven't made this sound too confusing, and I hope this is something some of you are interested in trying. Just get out your camera and have some fun trying things! Experimenting with your settings is the best way to learn. There are so many things your camera can do outside of that green square! IF they have me back for anymore future posts on photography, I will share with you an AWESOME (and inexpensive) little tool for getting AMAZING indoor shots like this, when you have little or no natural light, and you have to use that flash. This is for SLR's only though.

I could go on, and on, and on, and on about my love of photography, and all of the things I've learned over the past year. But I have no idea what you all are interested in, and I know that everyone is probably at different experience levels...so instead, I'd be happy to answer specific questions you have. You can post them in the comments section here, or email me: elephantjuicedesigns@gmail.com
I {LOVE} sharing things that will hopefully help someone else. THANK YOU so much for having me!
I {LOVE} sharing things that will hopefully help someone else. THANK YOU so much for having me!


7 comments:
WOW!!! THAT WAS GREAT!!! I WOULD LOVE TO LEARN MORE!!!
Thanks Laura! I've really learned a lot from you and I just took my daughters 3 month pics and had the flash on!! Thanks again! Laura also did my daughters newborn pics and she is a great person and photographer!!
Thanks for the comments ladies! I'm glad to know there are a couple people reading this and getting something out of it :) Melissa,you're too sweet! You should get that camera back out and do a take-two practicing with the flash OFF! AND then you can post the two on your blog to compare!
Wow you got so much more out of that class than Kim and I did. LOL
Your pictures are wonderful. You should take Kim and I out one of these days and not let us go home till we know how to use our camera's.
J
Can't wait to give this a try. Thanks for the advice and tips!! :)
OK i know it took me a few days but now that I am reading thru this I kinda get it. Im with Jennifer tho Laura needs to take us on a field trip
I would LOVE to have field trip with you girls :) You just say when, and I'm there! Maybe in a month or so when it's a bit warmer!
Post a Comment